Learning How to Stop the Vehicle in an Emergency
When it comes to the driving test, part of the criteria may include demonstrating the emergency stop (also called the controlled stop).
The emergency stop is a key routine that every learner driver must understand and be able to perform safely. It may be requested during your test, but more importantly, you must know how to stop the car quickly and under control in real emergency situations once you’ve passed.
Practise it calmly with a DVSA-approved instructor in Hackney and East London.
Manual lesson prices →
Automatic lesson prices →
Will I Need to Do the Emergency Stop on the Driving Test?
You won’t know in advance if your driving test will include the emergency stop. Generally, for every three driving tests an examiner conducts, only one candidate will be asked to do the emergency stop exercise.
The Emergency Stop on the Driving Test
If you are the candidate chosen for the emergency stop, at some point the examiner will ask you to pull up and park on the left. Once the car is secure (handbrake on and neutral selected), the examiner will explain that they’d like you to demonstrate the emergency stop procedure.
They will then give you clear instructions about how they will signal when they want you to stop.
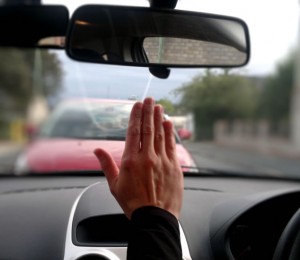
Emergency stop hand signal given by
the driving examiner during your test
Emergency Stop Hand Signal
The examiner will explain that shortly they are going to give you a signal to stop the car, as if it were a real emergency.
They will tell you what the signal is. This is usually:
- a clear verbal command such as “STOP”, and
- an emergency stop hand signal – usually raising their hand, palm facing outwards, just below the interior mirror.
The examiner will also tell you:
- they will check over their right shoulder to make sure it is safe before giving the signal, and
- not to anticipate the stop – you must only react when they actually give the signal.
It is very important that you wait for the examiner’s verbal and hand signal before stopping. Conditions might not be safe if you brake suddenly without being asked.
Emergency Stop Procedure
The examiner will then ask you to move off again when you are ready.
In a real emergency, you do not have time to check mirrors before braking. The test mirrors this: do not check your mirrors first when the examiner gives the emergency signal.
The examiner is looking for three key elements:
- Speed – a fast but controlled reaction from coming off the accelerator to pressing the brake and then the clutch.
- Control – bringing the car to a brisk, safe stop in a straight line without losing control.
- Observation – making sure it is safe before moving off again once the exercise is complete.
The emergency stop is usually carried out on a quiet 20 mph road. The speed for the exercise is close to 20 mph. If there are vehicles close behind, oncoming traffic, cyclists or pedestrians nearby, the examiner will wait until the road is clear before asking you to stop.
When the examiner gives the signal:
- quickly release the accelerator pedal,
- press the brake pedal firmly (not stamping on it),
- keep both hands on the steering wheel in your normal driving position, and
- keep the car straight and be alert for any signs of the wheels locking and starting to skid.
We’ll run through the exact emergency stop routine the examiner expects, step by step.
Contact us to check availability →
Do I Signal / Indicate for the Emergency Stop?
A very common question from learners is whether they should indicate before or during an emergency stop.
The answer is simply: no.
In a real emergency:
- you would not have time to signal, and
- you must keep both hands on the steering wheel for maximum control.
If you purposely indicate during the emergency stop on your test, it could result in a fail, because it shows you are not prioritising control. After the car has stopped and the exercise is finished, you may then signal if necessary when moving off.
Clutch Use and Coasting During the Emergency Stop
An important part of the emergency stop is pressing the clutch at the very last moment before the car stops.
If you press the clutch too early, or at the same time as the brake, this is called coasting. Coasting reduces the effect of the brakes because the engine is disconnected from the wheels.
The correct sequence is:
- foot off the accelerator,
- firm brake,
- then clutch down just before the car comes to a stop.
Once the car is stationary:
- apply the handbrake,
- select neutral, and
- come off the pedals.
The examiner will then tell you that they will not ask you to do that again, and will ask you to move off when ready.
Because your car may now be stopped towards the centre of the road, it’s important to:
- check both mirrors,
- check over your right shoulder, and
- also check the left blind spot if you are near the middle of the road,
before you move off.
Emergency Stop – Common Reasons for Failing
Typical reasons for failing the test on the emergency stop include:
- Checking mirrors before braking (instead of reacting immediately).
- Coasting – pressing the clutch too early or at the same time as the brake.
- Not stopping quickly enough.
- Locking the wheels and skidding, and not regaining control.
We can practise emergency stops in a safe, quiet area until you feel confident.
See manual lesson prices →
See automatic lesson prices →
Emergency Stop – Braking Technique
When the examiner gives the signal, come off the accelerator and press the brake pedal quickly and firmly. You need enough pressure to stop the car promptly, but avoid stamping so hard that it immediately locks the wheels (especially in cars without ABS).
Emergency Stop with Anti-Lock Brakes (ABS)
In good, dry conditions:
- press the brake firmly and keep your foot pressed down until the car stops,
- then apply the handbrake.
ABS should prevent the wheels from locking, which means you should still be able to steer and maintain control.
Sometimes, even with ABS (for example on loose gravel or very wet roads), wheels can still lock or feel unstable. In these conditions:
- you may feel a vibrating or “pulsing” sensation through the brake pedal as ABS works,
- if you feel the car sliding, gently ease off the brake slightly to let the tyres grip again, then reapply firm pressure.
Practising emergency stops in different conditions makes this process feel more natural.
Emergency Stop without Anti-Lock Brakes
If you are learning in, or later drive, a car built before July 2004, it may not have ABS.
In a car without ABS:
- apply the brakes very firmly, but avoid stamping on them,
- too much pressure too quickly will likely cause the wheels to lock and the car to skid,
so you must find the balance between stopping quickly and keeping grip. You may hear tyre squeal if the wheels start to skid.
Emergency Stop – Skid Control
A skidding car is not fully under control for speed or direction. If you press the brake too hard and the car starts to skid:
- slightly release the brake pedal to let the wheels turn again, then
- press the pedal again more progressively.
This is called cadence braking. If you can stop the skid, regain control and still stop the car promptly, you can still pass the test.
Skidding and Anti-Lock Brakes (ABS)
If your car has ABS, skidding is far less likely, though not impossible in poor conditions. It’s important to:
- know whether the car you are using has ABS or not,
- understand cadence braking for non-ABS cars.
Most modern driving school cars have ABS. All new cars sold in the EU after July 2004 must be fitted with ABS. However, your first car after you pass may be older, so you should understand how to brake in an emergency with and without ABS.
Emergency Stop on Wet Roads
The examiner may ask you to perform an emergency stop in wet conditions. The risk of skidding is higher, so good braking technique is important.
In very icy conditions or extremely poor visibility, the test itself is likely to be cancelled, so you won’t be asked to perform the emergency stop then.
Emergency Stop and Pregnancy
It makes no difference to the examiner if you are pregnant or how many weeks you are. Their view is that pregnant drivers still need to be able to stop the car in an emergency to protect themselves and others.
Emergency Stop in Automatic Cars
In an automatic, the basic emergency stop routine is the same:
- off the accelerator,
- firm brake,
- both hands on the wheel.
Once stopped:
- apply the handbrake and
- select “P” (Park) if required.
We’ll practise the full routine in a safe area until you’re confident.
View manual lesson prices →
View automatic lesson prices →
Contact us to book →
Turn this emergency stop guide into real skill
Reading the routine is helpful, but practising it with an instructor builds real confidence.
- Choose manual or automatic lessons
- Check lesson prices and plan your first session
- Contact us to book your lessons
Manual lesson prices →
Automatic lesson prices →
Contact us →
DVSA-Approved Instructor • Manual & Automatic • ★★★★★ Local Reviews
Start here: AMDI Driving School
