Learning Parallel Parking / Reverse Parking
The reverse parallel park manoeuvre is one that many learners struggle with because it feels complex at first. Reverse parking is made much easier by using clear reference points, which is what we will use in this guide. The parallel parking reference points tutorial offers a guide from inside the car.
This tutorial will give you an ideal technique and step-by-step guide (with diagrams) to help you pass this part of the driving test. A good driving school or instructor should give you:
– Clear instructions
– A simple “formula”
– Plenty of reference points
…so the reverse parallel park becomes repeatable and less stressful.
There are no fixed rules for the exact technique you must use. However, during the driving test the examiner will be checking that you show three key points:
- Accuracy – to successfully park behind another vehicle, finishing not too far away from the vehicle in front and not too far from the kerb, without touching the kerb or mounting the pavement.
- Control – keeping the car’s speed under control with good clutch control and smooth, effective steering.
- Observation – constant all-round observation throughout the manoeuvre.
Prepare, Observe and Move (POM)
An essential routine for all manoeuvres is the driving routine POM:
- Prepare – prepare the car. For example, select the correct gear, set the handbrake, find the bite point if needed.
- Observe – observe all around to make sure it is safe to move.
- Move – move (or manoeuvre) the car slowly and smoothly.
The POM routine should always be carried out in this order whenever the car changes direction (forwards to reverse or reverse to forwards).
If, for example, you forget to prepare a part of the car after you have finished your observations, you must complete your observations again after you finish preparing.

Reverse parallel park: Diagram A
A) Parallel Park: Diagram
During the driving test, the examiner will ask you to park on the left. This might simply be to test your basic parking, or it might be the start of the reverse parallel parking manoeuvre.
The examiner will brief you that they want you to reverse parallel park behind the car in front. In diagram A this is the yellow car.
As you move off to get into position, move off slowly so you can place the car accurately. The examiner gives you plenty of time for manoeuvres, so there is no need to rush.
As you are about to pull alongside the yellow car, check your interior mirror and left door mirror. If there are approaching vehicles, cyclists or pedestrians, indicate to the left.
Ideally:
– Stop a little ahead of the yellow car (around half a car length)
– Keep about half a metre to 1 metre away from the side of the yellow car
Once stopped, remember to cancel your indicator if you used it. Now select reverse gear (even if traffic is approaching) so your reversing light shows your intention.
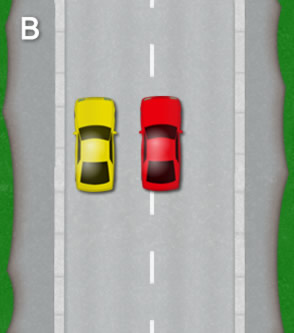
Reverse parallel park: Diagram B
B) Parallel Park: Diagram
Before you start reversing, you must take full, all-round observations.
– If there are approaching vehicles or cyclists, wait until they have passed.
– If there are pedestrians nearby or moving towards your car, stop and let them pass.
When you are happy it is clear:
– Look in the direction the car will move (out of the rear window)
– Begin to reverse very slowly – think “slow walking pace”
Good clutch control is needed to keep the car this slow. If your car allows, you can move the car just on the clutch and cover the brake in case you need to stop quickly (not all cars allow this).
You now need to get the rear of the two cars level. Set yourself clear reference points to help:
– If the cars are similar size and facing the same way, you can line the side mirrors up
– Another option is to line the rear of the yellow car with a position in your rear side window
It is better to go slightly too far back than not quite far enough. Not going far enough back can cause your car to swing into the parked car when you turn.
Keep the car very slow so you have time to:
– Look around in all directions
– Check your reference points accurately
Once you are happy the cars are level, stop the car. You are now at your “point of turn”.
Most of the time in the test, the examiner will ask you to park behind a single car, not between two cars.
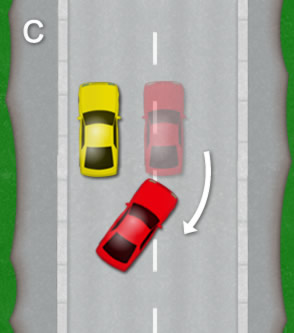
Reverse parallel park: Diagram C
C) Parallel Park: Diagram
Next, while reversing, you will be steering to the left. This is the point where the front of your car swings out into the road, so it is the most hazardous part of the manoeuvre.
Before moving or steering:
– Take full, all-round observation
– Include your right blind spot in case of cyclists or other road users you cannot see in the mirrors
If you are satisfied that it is clear, look out of the rear window and move the car very slowly backwards. As soon as the car starts to move, steer one full turn (360 degrees) to the left.
Using one full turn (rather than full lock) creates a shallower turning angle, around 45 degrees. This reduces the risk of your car swinging into the car in front.
You now need to find your next reference point – the point at which you steer to the right to straighten the car.
While reversing to this reference point:
– Keep up constant all-round observation
– Be ready to stop if vehicles approach
– Stop if you are reversing towards pedestrians and allow them to pass
– Keep making regular checks out of the rear window
This reference point can vary slightly from car to car. A common one is:
– Line up the left rear corner of your car with the right rear corner of the car you are parking behind – at this point, steer full right lock
Another option is to use the left mirror:
– When the kerb in your mirror reaches a certain point (often just about to disappear from view), that is your moment to right lock
Whichever reference point you choose or your instructor gives you, once you reach it, stop the car. Stopping at each reference point breaks the manoeuvre into stages, giving you time to look around and stay calm.
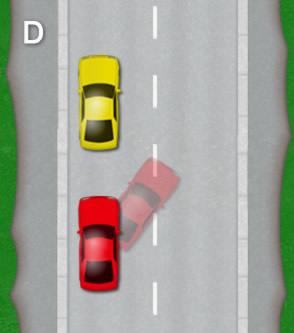
Reverse parallel park: Diagram D
D) Parallel Park: Diagram
It can help to choose a reference point that leaves you slightly too far from the kerb rather than too close. You can always adjust. Hitting the kerb, or mounting the pavement, may result in a test fail.
At your reference point:
– Steer full right lock to bring the car parallel to the kerb
– Keep reversing slowly and keep checking around you
– Use the left mirror to judge how close and how parallel you are to the kerb
You are looking to decide:
- If your car is parallel and about 30 cm from the kerb – in which case you can stop.
- If your car is too far from the kerb and needs adjusting.
If you are happy with the position and don’t need to adjust, then just before you stop, steer one full turn to the left to straighten the front wheels.
If you are too far from the kerb, you will need to repeat the point-of-turn process (as in Diagram C). This time, because the car in front is no longer a hazard, you can use full left lock as you move backwards to tighten the turn.
You may use a slightly different reference point for this second adjustment. One that often works:
– As you reverse on full left lock, watch the “triangle” in your left mirror (between the kerb and the side of your car)
– When that triangle disappears, steer full right lock to bring the car parallel
– When the car and kerb look parallel in the mirror, steer one full turn left to straighten the front wheels
Once you stop:
– Apply the handbrake
– Select neutral
There are quite a few reference points in this manoeuvre. With practice, they become automatic and the whole process feels much easier.
When you finish, if there is more than a car length gap between you and the car in front, pull forward slightly to reduce it. Make sure you still leave enough space to move off when the examiner asks, without having to reverse again.
I am text block. Click edit button to change this text. Lorem ipsum dolor sit amet, consectetur adipiscing elit. Ut elit tellus, luctus nec ullamcorper mattis, pulvinar dapibus leo.